The Flat-Felled Seam
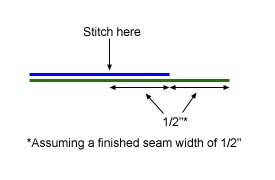
The appeal of the flat-felled seam is that it makes the joint stronger by running two lines of stitches through each piece of fabric, while simultaneously encapsulating the raw edges and preventing them from unraveling. What's more, it's pretty simple once you get the concept. You can make it even easier by running an iron over the seam after you make each fold. Set it to a low heat so that you don't melt your fabric.To begin, lay one piece of fabric on top of the other. If your fabric has two differing sides (for example, urethane-coated nylon, which has a coated side and an uncoated side) then the two "top" sides should be together. The bottom piece of fabric should extend beyond the upper piece by the width of the seam (the seam-to-be, that is). Sew a line of stitching in from the edge of the top piece by the width of the seam.
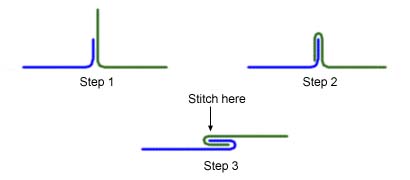
Flip the bottom piece out from underneath so that both are lying flat on the table and the extra flap sticks up in the air. Fold the longer flap down over the short one and then fold both of them down flat, as shown. Sew a line of stitches to hold down the flap. When you sew this second row of stitches, be sure to gently pull the two pieces of fabric taut and press the overlap flat as you feed it through the sewing machine. This will result in a cleaner and stronger seam.
Return to the TarpTent.