Introduction
A tent you make yourself can have several advantages over a commercial product. This one is cheaper ($60-$70 all told) and substantially lighter (about 1.5 lbs). It took me slightly more than a weekend to make, and you'll probably be quicker.Before we begin, I need to acknowledge my debt to others who have published their efforts: My principal sources were Henry Shires' TarpTent and Ray Jardine's tarp instructions, which can be found in his book Beyond Backpacking.
Design Concept
My tent is modeled on Henry Shires' TarpTent. I have made a few changes to the design to fit my needs and desires and I've also implemented a few refinements. For one thing, I wanted to make the front and rear edges of the tent vertical when viewed from the sides, which they are not in Shires' tent (his tent slants to the rear). I also decided that I wanted to increase the airiness and usable space of the tent by lifting both sides off the ground. Although Shires says that the bug mesh breaks up any flying rain enough to keep the interior dry, I was worried that I might not be as tolerant of rain intruding through the large front opening. So I added a simple awning which covers the front end of the tent. It fits loosely enough that there should still be plenty of ventilation inside, and in addition to keeping rain off the front door, it provides a protected area in which gear, boots, etc. can be stored. This is similar to the beaks which Shires suggests for the front of his tarptent, but it covers the front mesh entirely and also protects some square footage in front of the tent. It's entirely optional, so you can decide to make it or not and take it or not.I also wanted to retain some of the flexibility of a plain 'ol tarp while also preserving the benefits of a tarptent. The main advantage of a tarp, as I understand it, is that it can be pitched closer to the ground if heavy rain or high winds require it. The design of this tent has a more fixed geometry. I developed the following system to allow it to be easily erected in a more weatherproof fashion. The front pole consists of three sections. The middle section is 12" long and the pole in not shock-corded. If bad weather is anticipated, the middle section is simply removed from the pole. The front end of the tent is then 12" lower, the front corners rest on the ground, and the tent becomes much more snug.
While my final design deviates somewhat from Henry Shires' method, I would still highly recommend that you read his instructions. Other excellent sources of gear-making information are The Lightweight Backpacker and Thru-Hiker.com.
For a peek at some of the mathematical concepts behind this design, check out my discussion of the TrigTent.
Caveats
This was my first ever sewing project. I am not an expert. I tried to give a lot of detail when writing these instructions, but I don't intend for them to be followed slavishly. Think of this document as a collection of advice. If you take what I've provided here and use it to produce your own more-advanced model, I'll be happier than if you just follow my directions step by step.The first piece of advice I will offer is this: Read through these instructions carefully before you begin. I know this sounds a little contradictory, given what I just said, but what I want to point out is the need to go through the entire process in your mind. Some parts might get difficult otherwise. For example, in the front peak we have to deal with: the ridgeline seam, the hem on the front edge of the tent, a reinforcing patch, a webbing pull loop, the front mesh panel, and the zipper. Thinking through these details beforehand will be time well spent.
Materials
- 1.3 oz silicon-impregnated ripstop nylon - 7.5 yards
- This fabric (known as "silnylon") is currently all the rage for lightweight homemade backpacking products. My personal feeling, after some first-hand experience with the material, is that I would have preferred a slightly heavier fabric. In certain respects, silnylon is quite strong, but in others I find it a bit worrisome. It would be quite easy to poke a sharp stick or rock right through a taut silnylon tent. I'm also a little worried about stitches in high-stress areas pulling through the fabric. Still, people use silnylon for projects ranging from stuff-sacks to ponchos to backpacks and they do so without suffering any catastrophic failures. I think the best course is to decide just how careful you want to be with your gear and then choose your fabric accordingly.
- Noseeum mesh - 4.5 yards
- 1.9 oz uncoated ripstop nylon - .5 yard
- High-stress areas of the tent call for some extra reinforcement, which is provided by this fabric. Henry Shires points out that patches made of uncoated fabric won't trap water between themselves and the waterproof roof, which makes sense to me. Half a yard is more than enough. Use the leftovers to make a bag for the tent.
- Nylon webbing - 6 feet
- Shires recommends 3/4," Jardine says 1/2." I say, do as I did, and pick up whatever the store has in stock. I used 3/4." (But bear in mind that this width will determine seam widths later on.)
- Tri-glide or LadderLoc adjuster - 1
- Size to match your webbing.
- Zipper - 5 feet
- #5 is a good size. One could perhaps go a size smaller with care, but there definitely no need for anything larger. Also get a double tab slider and two bottom stops (more if you think you might lose these tiny parts in the carpet). A top stop isn't absolutely necessary, but I look at it as nice insurance and cheap at $0.29.
- Velcro - 5 inches or so, both hook and loop
- This is for a loop to hold the door open when the need arises. Entirely optional.
- Thread
- I got two 100 m spools of standard weight 100% polyester thread. This was just barely enough, so a 250 m spool would give you a nice cushion in case some mysteriously vanishes.
- Sewing needles
- Apparently it's good practice to put in a fresh needle when starting a project of this type. I used a size 70 universal point and had no problems.
- Seam sealer - Small tube
- If you're using silnylon a 2.8 oz tube of 100% silicone sealant, available at a hardware store, will be more than enough. Also pick up some mineral spirits to dilute the silicone. If you've chosen urethane-coated nylon then you need to use a product specifically designed for sealing this fabric, such as SeamGrip.
- Poles
- High-quality Easton aluminum poles can be custom-made by TA Enterprises.
- Grommets - 2
- These are sized to the tips on the ends of your poles.
- Stakes - 6 to 10
- The entire tent & awning needs ten stakes. Removing the vestibule eliminates two stakes, and the two side pull-outs aren't entirely necessary, which leaves six stakes for the bare minimum.
- Guy line - 20 to 30 feet
- I got some thin (about 1/8") line at the hardware store. Twenty or thirty feet is plenty.
Construction
Part One: Roof
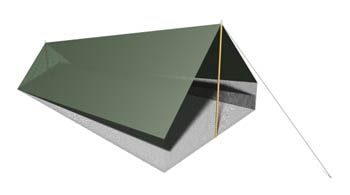
Step one is to lay out the two roof sections. It's important to do this carefully. A large flat area is essential: a ping-pong table is ideal. Make sure you understand this sequence well, because there are a couple of "gotchas."Our final goal is a tent which is 8' long, 5' across at the front, and 3' across at the back. The front is 3.5' tall, the back is 1.5' tall, and the front corners are lifted 1' off the ground. It looks something like this:

In order to satisfy those dimensions and keep the front and back edges vertical (as they are in the drawing) we need a rather strange shape:
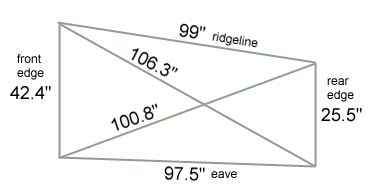
However, we also need to account for the seams and hems we'll be making. If we didn't the tent wouldn't be ruined, but it would turn out a little smaller than we intended. The edge that will be in the ridgeline seam will need an allowance of 1.5 x the width of the finished seam (so a 1/2" seam would need a 3/4" allowance) and the edges which will be hemmed need an allowance of twice the width of the hem (a 1/2" hem requires a 1" allowance). I laid out the four corners of the piece to the exact dimensions above first, and then eyeballed the extra for the allowances.
Since the center seam and the hems will have webbing sewn to them, their size depends on the size of your webbing. If you get 1/2" webbing, make your hems and seam to match, and the same for 3/4" webbing. I used 1/2" seams and 3/4" webbing, which was a mistake.
Now that we know all this, we're ready to lay out the pieces and cut them. Try to lay them out so that the ridgeline edge is aligned with the weave of the fabric, rather than cutting diagonally across it. If the ridgeline isn't aligned with the weave, then when you put tension on it it'll wrinkle up like mine instead of laying flat. Your layout should look something like this:

At last, we have the two roof pieces cut out and we can sew them together. We're going to use a flat-felled seam. If you don't know what this is (I didn't before I did this project) here are some instructions. Don't hem the edges yet; that comes later.
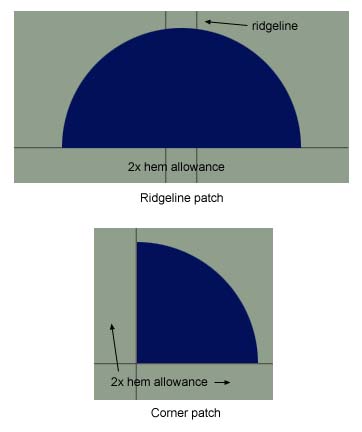
The last bit of preparation our roof needs is to sew on some reinforcing patches, cut from our 1.9 oz uncoated nylon. These go in the four corners and at the ends of the ridgeline and will reinforce these high-stress areas. I used semi-circular patches with a diameter of roughly 4.5". In retrospect, they look kind of small, and I would suggest a large diameter, say 6 or 7 inches. (Note: again, that's diameter, not radius.) Also, circular patches are hellishly difficult to sew on flat, especially with this slippery silnylon. Henry Shires uses rectangular patches which would probably be quite a bit easier to attach and work just as well. Whatever the shape of your patches, when you sew them on remember to leave room for the hems. The hems are made by folding over the fabric twice and we want the second fold to overlap the patch, so the extra room you leave should be the same as the allowance you made for hem when doing the layout. So for a 1/2" hem the patch should be set back 1" from the edge. (1" from both edges in the case of the corner patches.) Sew a couple of rows of stitches along the edge of the patch, one row about 1/4" in, and the other 1/4" inside of that. Since this is uncoated nylon, you also need to seal the edges, either with a flame or seam sealer, to keep them from fraying.
Part Two: Walls
The mesh panels are much easier to lay out than the roof. The shapes are all simple triangles, to which we add an 8" strip on the bottom. This strip lies on the ground and keeps the bloodsuckers out. Again, we need to add a little extra for hems, etc, but not quite as much as for the roof. Add an amount equal to the width of your hem to the top edge of the mesh, and about 1/2" on all the other sides. Go ahead and cut out those pieces.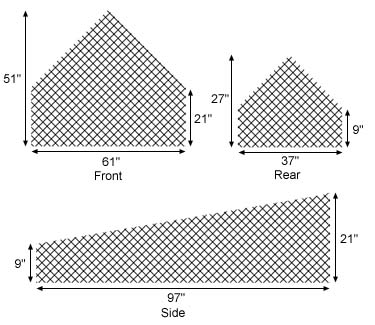
Don't include the roof's hem allowance in the length of the mesh panel. Use the finished dimensions of the roof as shown in the layout diagram a few steps back. The dimensions in this drawing are based on those measurements, plus one inch to give a little extra material. Feel free to use these, if you trust me. ;)
Before you sew the panels onto the roof, hem the bottom edge (of the mesh) by simply folding over a quarter inch or so and sewing it down. This noseeum doesn't seem likely to unravel, but the hem will add a bit of strength and protection and certainly won't cause any problems.
Now we can attach the netting to the roof, beginning with the two long side pieces. This method is complicated to explain, but not difficult to carry out, and the finished product is strong and looks clean.
First, lay the mesh panel on the top side of the roof (the top side is the side opposite the folded-over flap of the flat-felled seam: the smooth side) with the inner side of the panel up (the inner side is the one you folded the hem flap onto). Now fold over 1/2" of netting at the end where you plan to begin sewing so that the fold is up. This extra flap will be used to sew the mesh panels together in the corner. Align the folded-over edge with a mark that is a distance three times the hem allowance away from the edge, align the long edge of the mesh with the long edge of the roof, and begin sewing. (The picture should make this a lot clearer.)
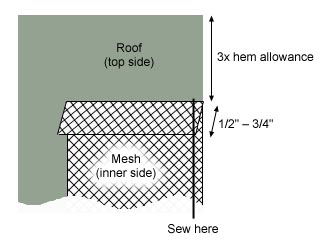
As you sew, the mesh will probably stretch slightly and give you a little more extra at the end than you had planned for. This is no problem. Just fold it over as you did for the beginning edge (with the fold up again, and the folded edge three times the hem allowance away from the edge of the roof) and sew it down. This line of stitches is really just to hold the mesh and nylon together temporarily, so you can use a long stitch length.
Now in one fell swoop we're going to hem the edge of the roof and permanently attach the mesh panel. Simply fold the edge of the roof over twice as if you were hemming it and carry the mesh with along with it. When the folds are complete, the mesh should lie flat against the underside of the roof and tuck under the hem. Run a line of stitches along the hem, and you're done with this panel. Repeat for the other side.
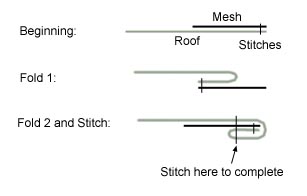
Next we sew on the rear mesh panel using the same sew-to-the-top, fold-over system. It's more complicated this time, however, because rather than a nice long straight edge, we have to deal with corner where the two roof pieces meet. It's a very awkward process, at least for an inexperienced sewer such as myself, and I don't have any suggestions on how to make it go more smoothly. Just pin it well (don't worry about pin holes, since if you put them near the edge, they'll get folded inside the hem) and go slowly. Don't forget to sew folds in the ends of the panel, as you did for the sides. These folds will help seal out the bugs and strengthen the edges.
Remember that the professionals are selling this sort of thing for hundreds of dollars, so since you're only paying $60, it's okay if things don't look perfect.
Part Three: Door
Let's start by working on the zipper. Slide on the slider and zip the two halves together. If you bought a top stop, attach it now at the top (closed) end of the zipper. Since this zipper is going to run all the way to the top of the tent, we need to sew a small nylon extension to the top end of it. Otherwise we'd be trying to sew the hem across the end of the zipper, and that wouldn't work well. Cut a strip of your uncoated nylon that is about four inches long and about half or three-quarters of an inch wider than the zipper. Hem all the edges by folding them over once. Make sure that when you're finished hemming this strip, it's just as wide as the zipper. Fold the strip over widthwise so that the two ends meet. Now slip the top end of the zipper into the fold half an inch or so, so that zipper is "clamped" between the two ends of the strip and the strip adds an inch or so to the length of the zipper. Sew the strip on tightly, and in the process run some stitches up the sides of the strip to close it off.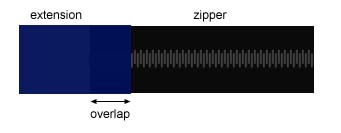
Now you can sew the zipper to the roof. Use the fold-over method that I laid out in the Walls section. Be careful to leave enough of the extension flap at the top for you to sew it into the hem on the other side of the door. In other words, if we're sewing the zipper to the "right" side of the door, we need to be able to sew the end of that extension to the "left" side of the door.
Once the extension panel is attached to the zipper and the zipper is sewn into the roof, sew the zipper to the mesh side panel. I couldn't think up a clean way to accomplish this. Just fudge it as well as you can.
The next step is to sew the mesh door panel to the roof, using the same program as before. This is also where we put in the velcro loop. One piece (hook or loop) need to stick out in front of the door, and the other behind it. By now you should be familiar enough with the hemming process to figure out how to sew these in, so I'll just say that one half needs to go in before you fold the hem over, and the other after. Also, you might point the hooks away from the mesh, because otherwise they'll grab it. When you sew the panel on, don't forget to fold in the ends of the panel as you did for the side panels. In this case, the fold next to the zipper will give us a nice strong edge to sew to the zipper tape, and the fold at the other edge will allow us to sew the door panel to its neighboring side panel.
Once you've finished sewing the mesh panel to the roof, sew it to the zipper tape. The corner where the mesh follows the edge of the roof might give you a bit of trouble, but just take it slow. Don't sew all the way down the zipper just yet. Stop a few inches past the edge of the roof. We'll finish this later.
Part Four: Support
Now for the pulls. We have three kinds of pulls to deal with: Corner pulls, ridgeline pulls, and middle pulls. The ridgeline pulls are the hardest, so we'll start with them.Unlike the other pulls, we have to sew the ridgeline pulls to the top of the roof. Cut off a piece of webbing long enough to start at the inward edge of the reinforcing patch, run forward along the ridgeline and off the tarp for about two inches, then fold back and overlap itself by four inches or so. In other words, the webbing will have a long tail and a short tail. (You could make both the same length, but I don't think it's necessary.) Sew the webbing down securely, using several rows of stitches. Make sure that you only sew the webbing to the ridgeline, and try not to accidentally sew the mesh panel to the roof. Both the front and the rear pulls go on the same way.
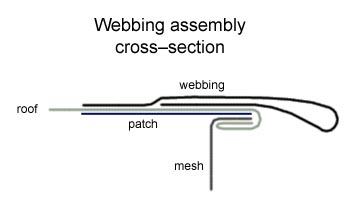
I should note that Henry Shires doesn't go to all this trouble. He simply folds a short piece of webbing in half and sews it to the hem, as we'll do for the middle pulls later on. I felt that since the ridgeline pulls take the most stress, they needed to be firmly attached. Now I'm starting to wonder if it was worth the bother and if Shires' method isn't strong enough.
The corner pulls are much simpler. Cut a piece of webbing that is about five inches long. Fold it in half at an angle so that it makes a narrow V and then sew the ends to the underside of the hem in the corner. Repeat for the other three corners.
The middle pulls go in the middle of the long sides and are meant to pull them out and make the tent a little roomier. They don't take much stress, so I didn't specify that any reinforcing patches should be sewn in to back them up. The patches are primarily to prevent the roof nylon from tearing under strain, and there's no danger of that here. There is the possibility that if you try to get your tent really tight, you might be able to yank the middle pulls off the fabric. So what I did was to sew a three inch strip of webbing to the top side of the hem where I wanted to attach the pull. Then I folded the pull in a V and sewed it to the underside of the hem, sandwiching the hem between the two pieces of webbing. This method seems secure.
Part Five: Finishing touches
Well, we've done all the important steps. Just a few details left now. Start by setting up the tent. You can use whatever makeshift arrangement you like, (I did it in the basement using paint cans as "stakes") but be sure that it's set up properly. The peak should be 42" above the ground, the two front corners should be 12" above the ground, and the front should be reasonably taut, as should the rest of the tent.First take a look at the zipper and decide just how long you would like it to be. It should extend to the ground and a few inches beyond, but it doesn't have to run all the way to edge of the mesh. It won't do any good lying on the ground and you'll just have to unzip and zip that extra length. Once you've decided on a length mark that point.
Move to the other side of the door. The mesh in this corner needs to be sewn together to keep the bugs out. Get inside the tent and pin the two panels together so that they hang smoothly and slightly to the inside of the tent.
I chose not to sew the mesh panel at the foot to the side panels. (At least, I put off the decision until I have some experience with the tent.) It's not necessary, but it might make setup a little simpler. Or more complicated. I don't know. If you want to sew them to each other, now would be the time to pin them together.
Now take the tent down, move out of the basement, and go back up to your sewing machine. To finish off the zipper, first move the slider up above your designated bottom point. ("Well, duh!" you say, but it would be such a tragedy to cut off the bottom of the zipper and take the slider with it.) Take a bottom stop (the tiny U-shaped things) and force it over the zipper's teeth on one side. A pair of pliers helps. Once it's on all the way squeeze it with the pliers to make it permanent. Put another on the other strip of teeth. Now you can cut off the extra zipper tape (scissors work fine) and fuse the raw edge with a lighter.
Move to the other corner and—turning the tent inside out—sew the front mesh panel to its neighbor. If there's some unsightly extra mesh hanging inside the tent feel free to cut it off, but leave at least 1/4," enough to hold the stitches. Go through the rest of the mesh panels and hem any rough edges.
If you plan on making the awning, then continue with the next section. If not, skip Part Six and go to Part Seven.
Part Six: Awning
The awning was designed with several factors in mind in addition to sheltering the front of the tent and the ground immediately in front of it. It can be pitched to allow air to flow between it and the tent, increasing ventilation. It is also adjustable to allow for the use of a stick rather than an aluminum pole for the front support. After what you've already done, the awning will be a breeze.The basic shape is two isosceles triangles sewn together along one long side. A chunk taken out of the top of the ridgeline will allow the awning to pass around the front pole of the tent. Lay out two pieces with the raw dimensions below. Again, make sure to line up one of the long sides of each piece with the weave of the fabric and use that side for the ridgeline when you sew the two pieces together. Add a seam allowance where the two will be sewn together (using a flat-felled seam) and a hem allowance on the other two sides. See the roof layout section for a refresher on what to make these allowances.
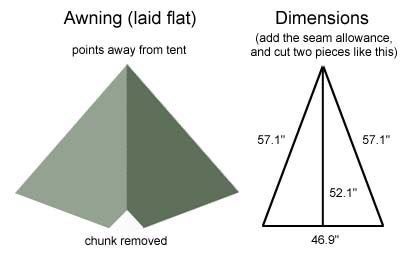
Set up your tent again, making sure that the front guy hits the ground about four and one half to five feet in front of the tent. Take one of the awning pieces and clip its ridgeline edge to the front guy of the tent using clothespins. Overlap the awning onto the roof by about five inches. The overlap should be more or less even all the way down to the edge of the roof, and the awning should hang down a little further than the roof. This overlap keeps rain from passing between the roof and the awning. At the top corner of the awning, mark where the awning flops over the ridgeline. This is the chunk you're going to cut out. It needs to be big enough to allow the awning to maintain a few inches of overlap even when the tent pole is sticking up through the gap in the awning. When the awning is finished and folded over the front guyline, the two corners made by the missing chunk will meet and touch each other. Transfer the mark you just made over to the other piece and chop off those chunks.
The first hem you should make is the shortest edge, newly created by the cutting of the chunk. Once that edge is hemmed on both pieces, sew them together using a flat-felled seam. Make sure to make the smooth side of the seam (the side opposite the flopped-over piece) the top side, as this makes the seam easier to seal. Hem the other two edges.
The awning attaches to the tent itself only at the apex. Regarding the other three corners, two are guyed to their own stakes and one attaches to the tent's front guyline. We'll finish the apex attachment first and we start by sewing a webbing tail onto the apex of the awning. Cut a piece of webbing that is as long as your awning's overlap plus two or three inches. Grab the two corners next to the center gap in the awning and bring them together, putting one on top of the other. Sew one end of the webbing to these corners so the other end hangs away from the awning. This will serve as the attachment to the body of the tent.
Now we make an attachment point on the roof of the tent to receive that webbing tail. You can use either a tri-glide or a LadderLoc adjuster. Both attach in more or less the same way.
Set up the tent, if it's not already erected, and drape the awning over the front guyline. Spread out the awning's two wings and attach them to the sides of the roof with clothespins. The awning should be set up with the maximum overlap possible. Make a mark on the ridgeline of the tent right at the edge of the awning. Take down the tent. Cut a short length of webbing and loop it through the attachment point of your tri-glide or adjuster. (The adjuster will have a specific attachment bar; for the tri-glide loop the webbing through the middle bar from underneath.) Sew the webbing loop to the top of the ridgeline, making sure that the attachment is on the far side of the mark, i.e. it won't interfere with the awning even at maximum overlap.
Sew the three other pulls onto the awning following the same procedure as for the corner pulls on the main tent. To set up the awning, you thread the webbing tail through the attachment point on the roof, adjusting it for maximum overlap. The two side corners get guyed out beside the tent and the front corner ties off to a loop in the front guy or to the front guy's peg. For more ventilation, the wings of the awning can be guyed further away from the roof, or they can be battened down tight against it. You could even tie one wing up in the air if you didn't need 360° protection.
Part Seven: The End!
The final step is to seal the seams. The hems are right at the edge of the roof and therefore don't really have to be sealed. The ridgeline is the seam that needs our attention. Set up the tent so that the ridgeline is stretched nice and flat, with the top side up. In a paper cup, mix a couple teaspoons of mineral spirits with a good dollop of silicone. Stir the mixture until it's smooth. If need be, adjust it by adding mineral spirits or silicone until the sealant isn't quite liquid. The exact consistency isn't that important. It just needs to be watery enough to soak into the stitches. Use a small foam brush to paint a stripe of sealent down the ridgeline. Give the ridgeline pullouts a good soaking. The sealant will look awfully shiny at first, but once it dries it's not so bad. If you wish, you can give it a second coat. After it's cured (let it sit overnight) sprinkle it with some talcum powder to make it a little less sticky.That's it! I hope your tarptent serves you well, and that you enjoyed
its creation, despite my attempt to fill your mind with clouds of buzzing
details. If only the noseeum mesh could keep them out!
© 2002 by Benjamin Miller. "Tarptent" is a trademark of Henry Shires.
Last updated March 1, 2002.
